-
Shop
- Adidas
- Advanced Technologies
- AI Skills Mastery 2026 Collection
- Apple Accessories
- Armani
- Best-Sellers
- Calvin Klein
- Car Accessories
- Clothing
- Dating & Social Skills
- Digital Resources
- Beauty
- Budgeting & Saving
- Car Buying & Ownership
- Cozy Feast Collection
- Emotional Intelligence
- Entrepreneurship & Business Growth
- Financial Education
- Financial Independence
- Financial Mindset & Psychology
- Goal Setting
- Hobbies
- Leadership
- Mindfulness
- Motivation
- Parenting & Child Development
- Personal Style & Fashion
- Pet Lifestyle & Wellness
- Positive Thinking
- Self Confidence
- Sleep Improvement
- Stress Management & Relaxation
- Travel Planning
- Yoga & Fitness
- Yoga & Mind-Body Practices
- Education & Learning
- Family & Parenting
- Fashion
- Accessories
- Alexander McQueen
- Bags
- Bags & Wallets
- Balenciaga
- Belts
- Blazers
- Blouses & Shirts
- Bottega Veneta
- Brunello Cucinelli
- Burberry
- Chanel
- Chloé
- Dior
- Dolce & Gabbana
- Dresses
- Etro
- Fendi
- Gucci
- Hats & Hair Accessories
- Hoodies & Sweatshirts
- Jacquemus
- Jewelry
- Jil Sander
- Jimmy Choo
- Kiton
- Luggage
- Luggage Bags
- Miu Miu
- Off-White
- Prada
- Rick Owens
- Saint Laurent
- Scarves
- Shoes
- Socks & Tights
- Sunglasses
- Sweaters & Cardigans
- The Row
- Tom Ford
- Tops & Shirts
- Valentino
- Valentino Garavani
- Versace
- Vivienne Westwood
- Watches
- Fashion Accessories
- Gadgets
- Guess
- Health & Beauty
- Health & Wellness
- Home & Garden
- Home Supplies
- Kids & Babies
- Kitchen Best-Sellers
- Luxury Brands Collection
- Nike
- Online Business for Beginners
- Patio, Lawn & Garden
- Personal Growth
- Pet Care
- Pet Supplies
- Pets
- Smart Home Living Guides
- Sport & Outdoors
- Super Deals
- TikTok Growth & Monetization Mastery
- Travel
- Wealth
- Wealth Building
- Popular
- Best deals
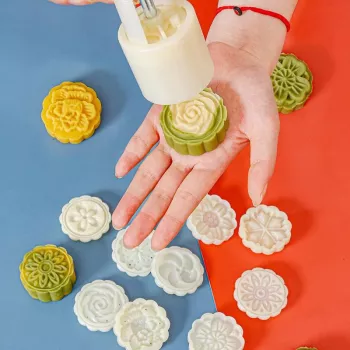
Floral Mini Jelly Mooncake Press Mold Set (Cookies/Fondant)
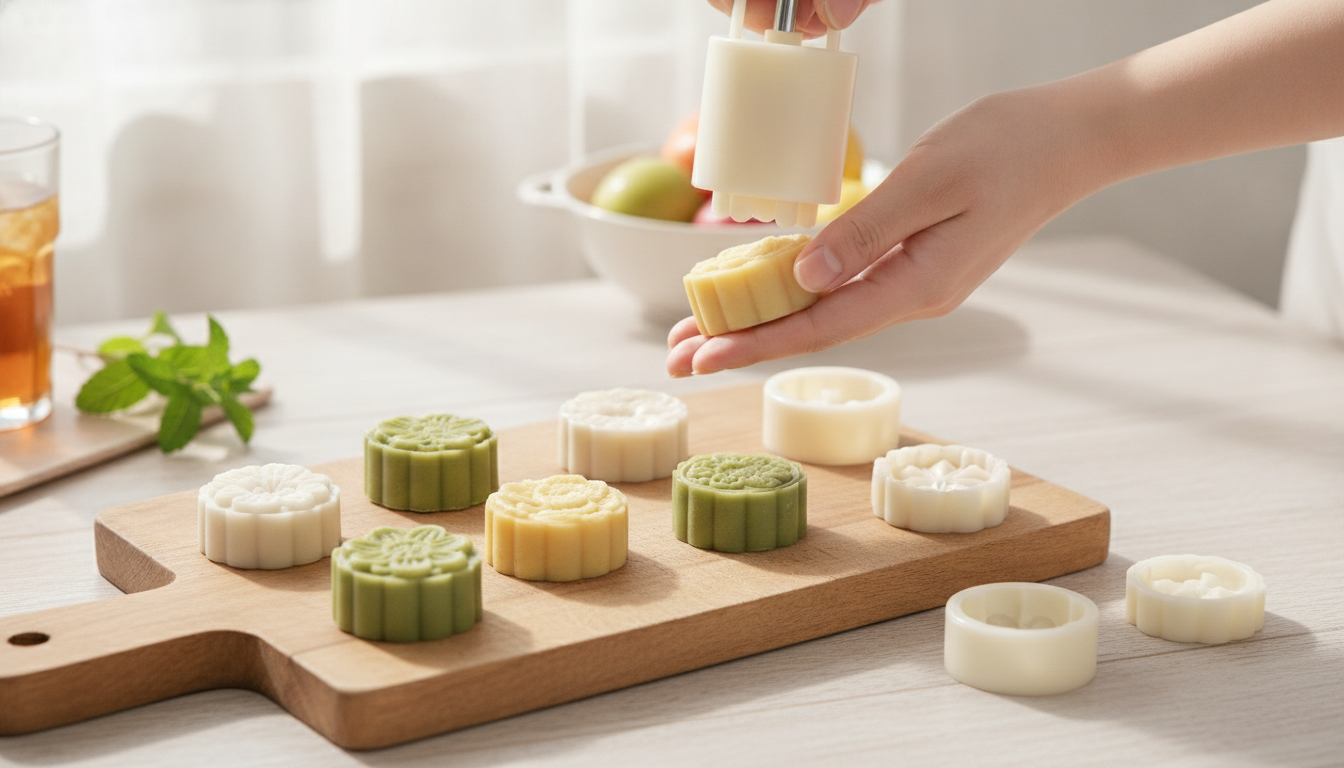
Mini Jelly Mooncake & Cookie Press Mold Set – Floral Fondant Pastry Tool
Create neat, repeatable floral shapes for mini jelly mooncakes, cookies, and fondant pieces with a compact press-style mold set. The big advantage of a handheld press is consistency: once you dial in portion size and the right amount of chill or dusting, each piece comes out with clean edges, a centered pattern, and a uniform height that looks polished on dessert trays.
For anyone making seasonal treats, gift boxes, or party favors, this style of mold speeds up batches without sacrificing detail—especially when delicate doughs tend to stick, smear, or tear during release.
What this mold set helps make
- Mini jelly mooncakes with clean edges and defined floral tops
- Pressed cookies or shortbread-style rounds with decorative patterns
- Fondant toppers for cupcakes, petit fours, and plated desserts
- Stamped pastry accents for tarts and hand pies (small decorative inserts)
- Party favors and seasonal treats that need consistent sizing
What’s included and how the press mechanism works
This set uses a simple press-and-eject workflow. You assemble the handheld body with an interchangeable floral plate, load a portioned amount of dough or confection, then press down steadily to shape and imprint. A final push ejects the formed piece so you can place it directly onto parchment or a tray.
- Handheld press body designed to shape and eject a formed piece with a single push
- Interchangeable floral pattern plates used to imprint the top surface
- Compact size suited for bite-size portions and quick batch work
- Simple assembly: insert pattern plate, load portioned dough/fondant, press, then eject
- Consistent results with portioning: weigh or scoop equal amounts before pressing
Typical uses by material and prep tips
| Material | Best prep for clean release | Quick tip |
|---|---|---|
| Jelly mooncake mixture | Chill mixture briefly so it holds shape | Lightly oil the mold if sticking occurs |
| Cookie dough | Use a smooth dough; avoid large inclusions that break patterns | Chill dough 10–20 minutes for sharper details |
| Fondant | Knead until pliable; dust lightly with cornstarch or powdered sugar | Roll to even thickness before pressing |
| Marzipan / modeling chocolate | Warm slightly in hands; keep surface lightly dusted | Press gently to avoid smearing fine lines |
How to use it for mini jelly mooncakes (step-by-step)
- Prepare the jelly mooncake mixture or filling and portion evenly. A small kitchen scale helps keep every piece the same size.
- Assemble the press with your chosen floral plate and make sure it sits flush so the design stamps evenly.
- If the mixture is sticky, lightly coat the inside with a neutral oil. Use the minimum needed—too much can soften the imprint.
- Load the portioned mixture into the barrel and press down with steady, even pressure to form the shape and imprint the top.
- Eject onto a parchment-lined tray. Avoid twisting during release; twisting can pull at edges and distort the pattern.
- Chill or set according to your recipe so the floral detail stays crisp when handled or packaged.
How to use it for cookies and fondant
- For cookies: roll dough into small balls, press to shape, then transfer carefully to a baking sheet.
- For cookies: keep dough cool; warm dough can blur floral lines and make release harder.
- For fondant: dust the mold lightly, press, then lift edges gently before ejecting if the design is intricate.
- For layered looks: press a base color, add a tiny contrasting piece, then press lightly again for a two-tone floral effect.
- For uniform batches: use a small scoop or scale so all pieces bake/set evenly.
Tips for sharper floral detail and fewer sticking issues
- Chill dough or mixtures briefly; cooler materials hold lines and edges better.
- Use the lightest effective dusting (cornstarch/powdered sugar) to avoid chalky residue on fondant.
- Press with steady, even pressure; rapid force can distort edges or trap air.
- If details look shallow, slightly increase portion size so the pattern plate fully contacts the surface.
- If edges crack, the material may be too dry—knead briefly or adjust moisture/fat as appropriate for the recipe.
- Clean pattern plates thoroughly; residue in grooves is a common cause of blurred designs.
Cleaning, drying, and storage
Because the floral grooves are fine, quick cleanup makes a noticeable difference in your next batch. Disassemble, wash, and dry completely so sugar and oils don’t harden into the pattern lines.
For general guidance on food-contact materials and safe cleaning habits, see the U.S. Food & Drug Administration overview of food contact substances and the USDA FSIS recommendations for cleaning and sanitizing food-contact surfaces.
A simple way to start: quick practice routine
Shop tools and extras (in stock)
- Mini Jelly Mooncake & Cookie Press Mold Set – Floral Fondant Pastry Tool
- Men’s Genuine Leather Belt with Solid Brass Buckle
- Mini Golf Beginner’s Checklist | Easy Step-by-Step Guide for How to Take Up Mini Golf | Printable Digital Checklist for First-Time Players
FAQ
Why does the pattern look blurry after pressing?
The most common causes are dough that’s too warm/soft, grooves that still have residue, too much oil or dusting, or uneven pressure. Chill the dough briefly, clean the plate channels with a soft brush, and press down in one steady motion.
What can be used to prevent sticking without ruining the design?
Use the least amount that works: a light cornstarch or powdered sugar dusting for fondant, or a very thin oil wipe for sticky mixtures. Remove any excess so the floral lines stay crisp instead of filling in.
Can the mold be used for both cookies and fondant in the same day?
Yes—wash and dry the parts between materials so grease or sugar buildup doesn’t affect release and detail. Cleaning between uses also helps keep flavors from transferring.


Leave a comment